 Sign in to Mod The Sims
- Site Map >
- Modding and Creation >
- Sims 4 Creation >
- CAS Parts >
- Separate Item Category
- Site Map >
- Modding and Creation >
- Sims 4 Creation >
- CAS Parts >
- Separate Item Category
Replies: 11 (Who?), Viewed: 1570 times.
#1
 1st Sep 2014 at 5:14 AM
1st Sep 2014 at 5:14 AM
Posts: 11
I'm adding a photo to demonstrate.

is this in any way possible with current tools?
Advertisement
#2
1st Sep 2014 at 1:06 PM
1st Sep 2014 at 1:06 PM
Posts: 11,006
Thanks: 422947 in 1121 Posts
This must be possible, see this thread for example. I think you need to be using CAS Cloner (see the link in Tools > sticky).
Stuff for TS2 · TS3 · TS4 | Please do not PM me with technical questions – we have Create forums for that.
In the kingdom of the blind, do as the Romans do.
Stuff for TS2 · TS3 · TS4 | Please do not PM me with technical questions – we have Create forums for that.
In the kingdom of the blind, do as the Romans do.
#3
1st Sep 2014 at 2:23 PM
1st Sep 2014 at 2:23 PM
Posts: 163
Thanks: 802 in 9 Posts
Yup. CAS Cloner is what you need. Very simple process, too.
#4
1st Sep 2014 at 3:13 PM
1st Sep 2014 at 3:13 PM
Posts: 11,006
Thanks: 422947 in 1121 Posts
Maclimes, can you add whether this works the same with Mesh Cloner? (I’m not really a CAS person, so the differences are a bit fuzzy to me)
Stuff for TS2 · TS3 · TS4 | Please do not PM me with technical questions – we have Create forums for that.
In the kingdom of the blind, do as the Romans do.
Stuff for TS2 · TS3 · TS4 | Please do not PM me with technical questions – we have Create forums for that.
In the kingdom of the blind, do as the Romans do.
#5
1st Sep 2014 at 3:48 PM
1st Sep 2014 at 3:48 PM
Posts: 163
Thanks: 802 in 9 Posts
I think MagicMesh/Mesh Cloner only works for items that have a mesh (like clothes and hair and such). For items like eyes, tattoos, and other "flat" items, you need to use CAS Cloner.
I'm not 100% positive on this, but I'm pretty sure. Honestly, if all I'm doing is making a quick copy, I prefer CAS Cloner anyway. It has less options and details, but sometimes, that's a good thing.
I'm not 100% positive on this, but I'm pretty sure. Honestly, if all I'm doing is making a quick copy, I prefer CAS Cloner anyway. It has less options and details, but sometimes, that's a good thing.
#6
1st Sep 2014 at 4:11 PM
1st Sep 2014 at 4:11 PM
Posts: 11,006
Thanks: 422947 in 1121 Posts
Thanks for the explanation! =)
Stuff for TS2 · TS3 · TS4 | Please do not PM me with technical questions – we have Create forums for that.
In the kingdom of the blind, do as the Romans do.
Stuff for TS2 · TS3 · TS4 | Please do not PM me with technical questions – we have Create forums for that.
In the kingdom of the blind, do as the Romans do.
#7
1st Sep 2014 at 4:57 PM
1st Sep 2014 at 4:57 PM
Posts: 11
I see, thank you very much plasticbox and MaclimesZero. I will try this as soon as I get home.
#8
1st Sep 2014 at 5:05 PM
1st Sep 2014 at 5:05 PM
A more technical level explanation for what you are trying to accomplish:
The grouping of items under the thumbnail is controlled by a value in the CASP resource. If you load the item under S4PE and look it will be the "OutfitGroup" value. Changing this value will re-assign the item to a new thumbnail (or if you choose another existing OutfitGroup, it will add it to that thumbnail).
Currently the only way to change this value once you've created an item is to hex-edit the CASP resource.
codename: granthes -- Developer of Sims3/4 utilities
Now working on modding tools for the Sims 4 CAS Demo
#9
14th Sep 2014 at 12:13 AM
14th Sep 2014 at 12:13 AM
Posts: 30
Thanks: 181 in 1 Posts
So in case anyone is looking for the detailed description, I'll list what I've found to work below. I do not know and will not say that this is the only way to create your own thumbnail. But it has worked for me.
First to reference post above, Mesh Cloner will work for tattoos (I haven't tried this for makeup yet, though I intend to). I'll post the steps quickly below. I hope they make sense.
This "tutorial" assumes you already have a .DDS file of the tattoo (of whatever it is that you're trying to create your own thumbnail on) already created and saved. This will merely show you how I was able to create a thumbnail. Not how to create tattoos, makeup, etc.
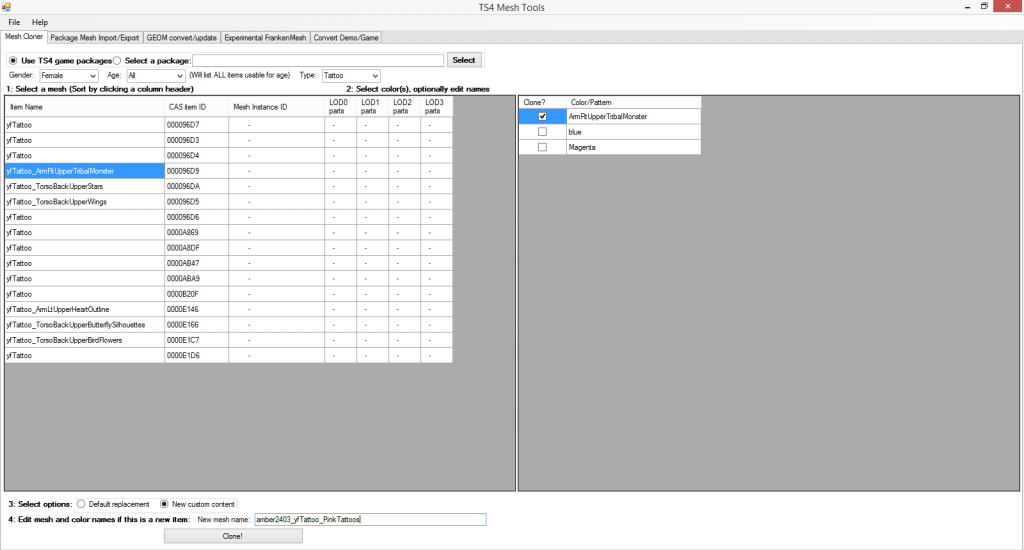
1) Open Mesh Cloner. Click the 'Use TS4 Game Packages' will bring up all of the files. Then you can filter them as you wish, as I have done in the screenshot below. Once you have the file and settings that you with, give the clone a new name and press the Clone! button. Save the file where ever you wish.
2) If it doesn't close automatically, you can close Mesh Cloner. Open ColorMagic. When you get to the screen below, check the 'Manual' box and find the clone file you just created. (Side Note: to redirect the path back to the game files once you're completed with this, then it is C:\Program Files (x86)\Origin Games\The Sims 4\Data\Client\resource.cfg)

3) Click next, select the file (there should only be one file to select), click next until you get to this screen.
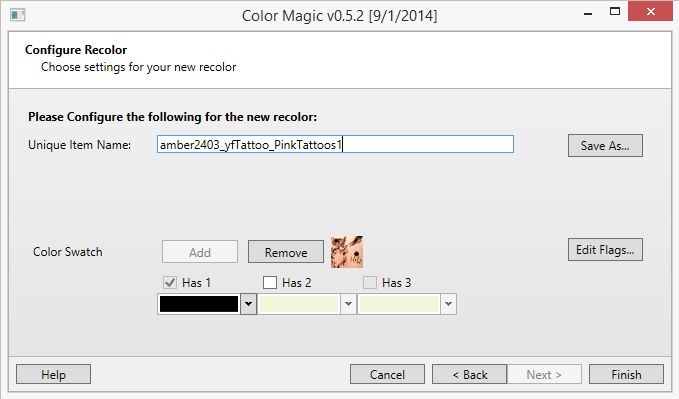
4) You will need to save it as a different screen name, although this file is going to override your clone file (I just know CM kept crashing when I tried to just save over and override my clone file). Click 'add' color swatch. Click Finish. If does not close automatically, you can close Color Magic. (Side Note: The key to this, I believe is to create your own 'swatch' in Color Magic, as illustrated in the screen shot above. The file it produces is needed for creating your thumbnail. This will not contain a tutorial on how to create your own swatch, but you can find one here: http://starrynitesims.blogspot.co.u...our-custom.html)
5) Now that you have your Color Magic file created off your Mesh Cloner file, you can delete your Mesh Cloner File (and rename the CM file to the original Mesh file name if you wish. I have done so by simply removing the '1' from the file name).
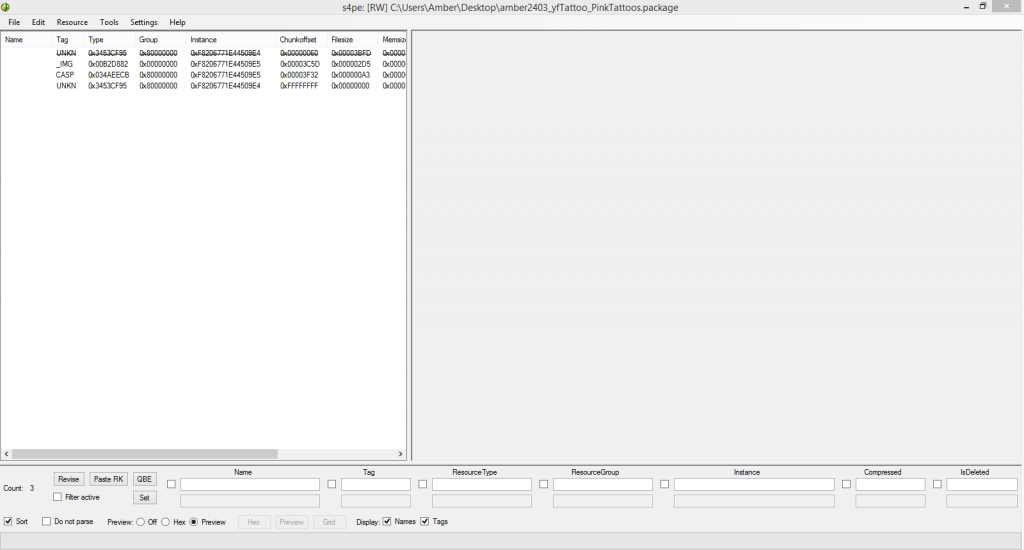
6) Open S4PE. Open your newly renamed (or not) Color Magic file.
7) Right click on the _IMG file (this file is created with adding a custom swatch in Color Magic). Click 'Details...' and copy the INSTANCE #. Click Cancel to close the Details box. Then Right click on the CASP file, Details... and paste copied INSTANCE # from the _IMG file into the INSTANCE field of the CASP file, overriding the original number. You will not touch the INSTANCE # in the UNKN file. Your INSTANCE #s for your CASP and _IMG files should now be the same.
8) Right click on your UNKN file and 'import from .DDS' the .DDS you created, to replace this file. When asked if you want to commit the changes, click yes.
7) Save file in your Mods folder and close S4PE.
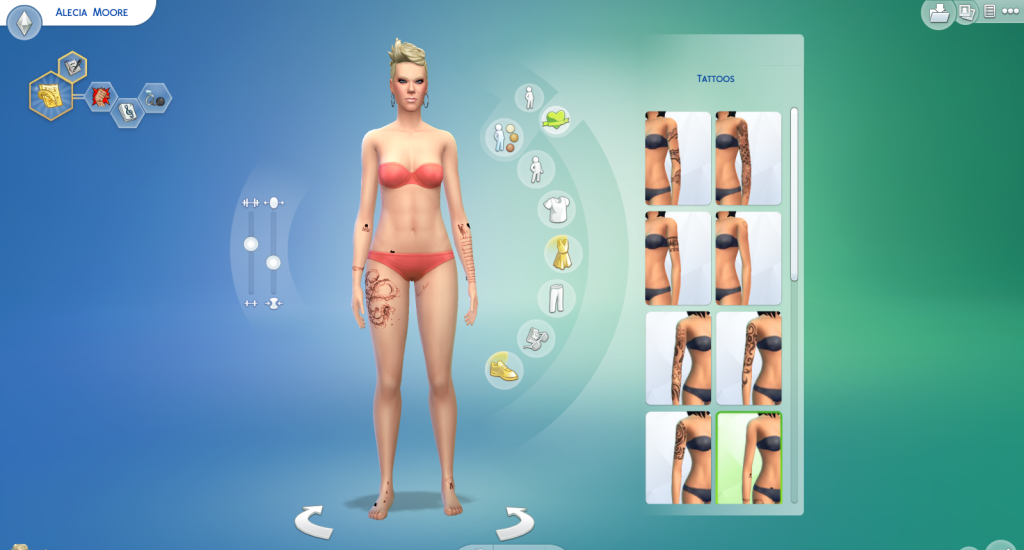
8) Load your Sims 4 game. And you have your own thumbnail!
Please note that I still consider myself to be a novice when doing all of this stuff. But I found that this process works for me. I would advise doing everything in the exact order as I stated above because I noticed any slight variation can cause the thumbnail to not generate. I have tested the exact order above twice, back-to-back. And both times a thumbnail successfully generated.
If anyone has an additional tips, tricks, suggestions then please feel free to add on.
Hope this helps.
Thanks!
First to reference post above, Mesh Cloner will work for tattoos (I haven't tried this for makeup yet, though I intend to). I'll post the steps quickly below. I hope they make sense.

This "tutorial" assumes you already have a .DDS file of the tattoo (of whatever it is that you're trying to create your own thumbnail on) already created and saved. This will merely show you how I was able to create a thumbnail. Not how to create tattoos, makeup, etc.
1) Open Mesh Cloner. Click the 'Use TS4 Game Packages' will bring up all of the files. Then you can filter them as you wish, as I have done in the screenshot below. Once you have the file and settings that you with, give the clone a new name and press the Clone! button. Save the file where ever you wish.

2) If it doesn't close automatically, you can close Mesh Cloner. Open ColorMagic. When you get to the screen below, check the 'Manual' box and find the clone file you just created. (Side Note: to redirect the path back to the game files once you're completed with this, then it is C:\Program Files (x86)\Origin Games\The Sims 4\Data\Client\resource.cfg)

3) Click next, select the file (there should only be one file to select), click next until you get to this screen.

4) You will need to save it as a different screen name, although this file is going to override your clone file (I just know CM kept crashing when I tried to just save over and override my clone file). Click 'add' color swatch. Click Finish. If does not close automatically, you can close Color Magic. (Side Note: The key to this, I believe is to create your own 'swatch' in Color Magic, as illustrated in the screen shot above. The file it produces is needed for creating your thumbnail. This will not contain a tutorial on how to create your own swatch, but you can find one here: http://starrynitesims.blogspot.co.u...our-custom.html)
5) Now that you have your Color Magic file created off your Mesh Cloner file, you can delete your Mesh Cloner File (and rename the CM file to the original Mesh file name if you wish. I have done so by simply removing the '1' from the file name).
6) Open S4PE. Open your newly renamed (or not) Color Magic file.
7) Right click on the _IMG file (this file is created with adding a custom swatch in Color Magic). Click 'Details...' and copy the INSTANCE #. Click Cancel to close the Details box. Then Right click on the CASP file, Details... and paste copied INSTANCE # from the _IMG file into the INSTANCE field of the CASP file, overriding the original number. You will not touch the INSTANCE # in the UNKN file. Your INSTANCE #s for your CASP and _IMG files should now be the same.
8) Right click on your UNKN file and 'import from .DDS' the .DDS you created, to replace this file. When asked if you want to commit the changes, click yes.

7) Save file in your Mods folder and close S4PE.
8) Load your Sims 4 game. And you have your own thumbnail!

Please note that I still consider myself to be a novice when doing all of this stuff. But I found that this process works for me. I would advise doing everything in the exact order as I stated above because I noticed any slight variation can cause the thumbnail to not generate. I have tested the exact order above twice, back-to-back. And both times a thumbnail successfully generated.
If anyone has an additional tips, tricks, suggestions then please feel free to add on.
Hope this helps.
Thanks!
#10
14th Sep 2014 at 12:22 AM
14th Sep 2014 at 12:22 AM
Posts: 487
Thanks: 29001 in 78 Posts
If you are just trying to get your CC to have it's own thumbnail, as opposed to being a swatch under it's original cloned item, it's MUCH simpler than that. Simply load your .package file into s4pe, click on the CASP file, click the grid button at the bottom, and change the "Outfit Group" to something unique. The format is 0x followed by 8 characters that range from 0-9, a-f. So something like 0x9EFFF757. Any items that have the same Outfit Group will be grouped together as one item in CAS. So if it is unique, it will show up by itself, or you can combine multiple recolors into your own group.
#11
14th Sep 2014 at 12:28 AM
Last edited by amber2403 : 14th Sep 2014 at 1:19 AM.
14th Sep 2014 at 12:28 AM
Last edited by amber2403 : 14th Sep 2014 at 1:19 AM.
Posts: 30
Thanks: 181 in 1 Posts
Thanks that makes more sense to me then when it was referenced above. I'll check that out and see if it works for me. What I posted above was the only way I could find, but this should make my process so much easier.
ETA: When I just replace the outfitgroup it doesn't replace the thumbnail picture. It shows the original cloned tattoo pic. It's in its own category. Just with the original picture, not the one I want it to show.
Changing the outfitgroup works, but you still have to change the Instance Numbers (the CASP and _IMG) to match. This changes that actual thumbnail picture for me.
#12
14th Sep 2014 at 3:58 AM
14th Sep 2014 at 3:58 AM
Posts: 11
Thanks: 9 in 2 Posts
Quote: Originally posted by granthes
|
A more technical level explanation for what you are trying to accomplish: The grouping of items under the thumbnail is controlled by a value in the CASP resource. If you load the item under S4PE and look it will be the "OutfitGroup" value. Changing this value will re-assign the item to a new thumbnail (or if you choose another existing OutfitGroup, it will add it to that thumbnail). Currently the only way to change this value once you've created an item is to hex-edit the CASP resource. |
Awsome! I have been wondering about this. Nice to see just changing the outfit group number is all you need to do, simple as pie! Thanks.
Who Posted
|
|