Hi there! You are currently browsing as a guest. Why not create an account? Then you get less ads, can thank creators, post feedback, keep a list of your favourites, and more!
Quick Reply
Search this Thread
Test Subject
Original Poster
#26 Old 8th Oct 2011 at 2:25 AM
Thankyou! Can't express how grateful I am. I have just been practicing my meshing on milkshape . I wish there was an easier programme! It's so hard to select certain points you need. Im going to sit down tomorrow an read through your instructions for the maxi dress. My head is going to explode if I try now. Haha!! I will let you know how I get on
Advertisement
Née whiterider
retired moderator
#27 Old 8th Oct 2011 at 10:57 AM
Selecting vertices in MS is much easier if you remember a few tricks:
  • You can click and drag to select all vertices within a box. So, rather than trying to click right on a single vertex, it's often easier to click and drag a small box around it which contains only that vertex.
  • Holding shift while clicking and dragging selects new vertices without deselecting the old ones. You can also hold shift and click a single vertex.
  • If you select a vertex you didn't mean to, you don't have to deselect everything and start again. Hold shift, and either right-click the vertex or click and drag with the right mouse button; this deselects one/some vertex/vertices while leaving the others alone.
  • If a vertex is in your way and you don't need it right now, select it and go Ctrl-H to make it invisible. This makes it much easier to focus just on the area you want to work with. Ctrl-shift-H to unhide anything you've hidden.
  • Ctrl-A selects everything.
  • You can select everything in a specific group by clicking the Select button on the Groups tab. Use groups liberally - they make it much easier to experiment, add things temporarily, delete things, hide a big section of the mesh quickly, etc. without affecting the other parts of your mesh.
  • If you find that you're accidentally selecting several vertices at once, don't forget that you can then deselect the ones you don't want in another panel. This is useful, for example, if you have several vertices one behind the other, and you need to select just the first one - you can select them all first in front view, and then deselect the vertices behind the one you want in side view.

What I lack in decorum, I make up for with an absence of tact.
Test Subject
Original Poster
#28 Old 8th Oct 2011 at 5:44 PM
Thankyou Whiterider! I dont know how I managed before reading that. It is so much easier now
Test Subject
Original Poster
#29 Old 8th Oct 2011 at 7:07 PM
Sorry guys... here I am again! I bet you all hate me 
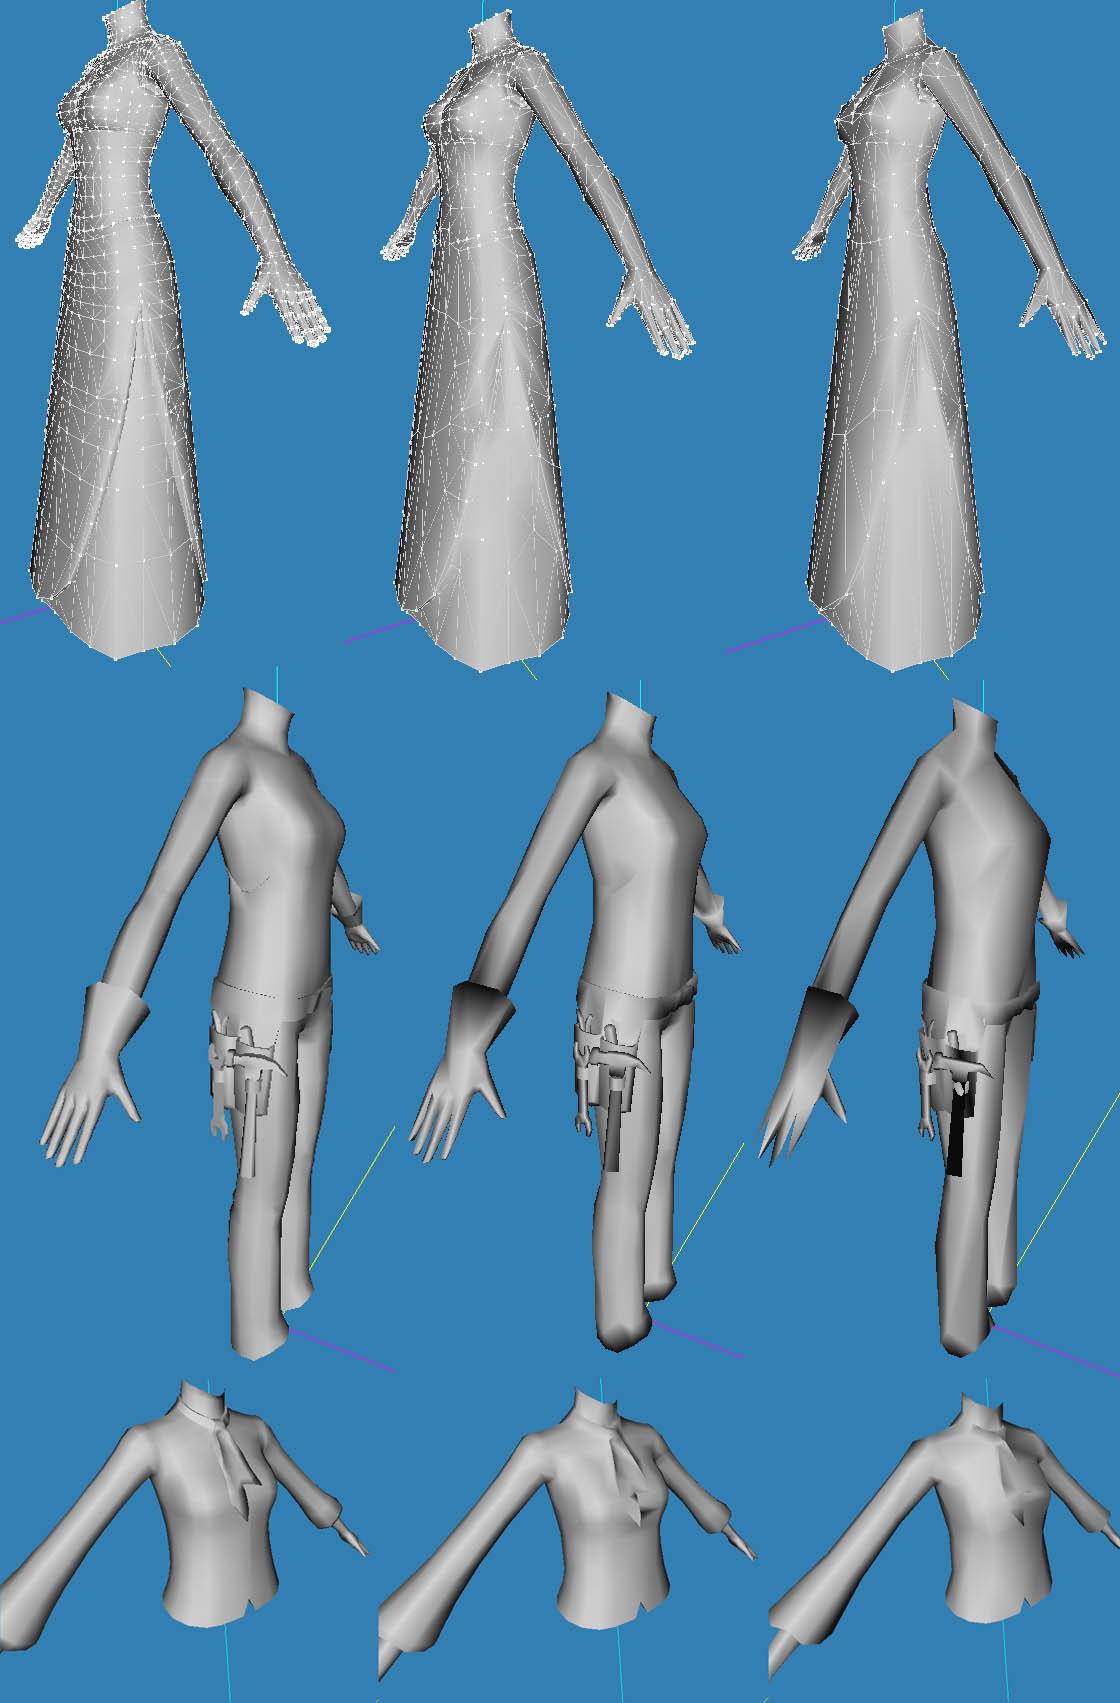
So, i altered a dress in milkshape.. made it shorter and less wide...but when I opened it in CAS.. this happened... Anyone have any ideas what went wrong?
Screenshots
Test Subject
Original Poster
#30 Old 8th Oct 2011 at 7:25 PM
oooh, i found out its because I put the original LOD's in. I put LOD1 in the other 3? and its worked but can you do that?
Test Subject
Original Poster
#31 Old 8th Oct 2011 at 10:35 PM
oooh no! Another problem.. im goig to scream! So i have created a mesh, and dragged the bottom down but the legs are cutting through the bottom. Does that mean I have to morph it??
Ms. Byte (Deceased)
#32 Old 8th Oct 2011 at 11:01 PM
You CAN put lod1 in all three slots, but it's not a good idea. The lods are meant to reduce the amount of work the computer has to do to run the game by using less detailed meshes for distant views.

What do you mean by "the legs are cutting through the bottom"? Can you post a picture?
Test Subject
Original Poster
#33 Old 8th Oct 2011 at 11:11 PM
This is what it looks like.. I tried making it wider but the legs still show through when she moves.

And oooh really?? How are you meant to make them exactly the same, three times? Thanks again for your patience!
Screenshots
Ms. Byte (Deceased)
#34 Old 9th Oct 2011 at 11:58 AM
That's called clipping, and it often happens when you have two layers of mesh. You've pulled the bottom of the skirt down, creating a layer of skirt over the top of the legs. You could try making the bone assignments of the sides of the skirt identical to the sides of the legs under them, but you'll probably still get clipping. The better way is to remove or lower the tops of the legs so they come just above the hem of the skirt, the way EA skirt meshes are made. If you remove the tops of the legs you'll have to make new morphs, so lowering the tops of the thighs and scaling them down a bit to fit would probably be easier.

When making lod2 and lod3, normally you'd use the EA original lod2 and lod3 and make the same changes as in lod1. If you've got an entirely new mesh or one with so many changes you don't want to do that, you can use the Milkshape DirectX tool: http://www.modthesims.info/showthread.php?t=429672
Test Subject
Original Poster
#35 Old 9th Oct 2011 at 12:18 PM
oooh! Thankyou Cmar.. I will try and fix it now, ill let you know how it goes! It takes me ages to edit a dress though... do all the lod's have to be exactly the same or just a similar shape?
Née whiterider
retired moderator
#36 Old 9th Oct 2011 at 3:43 PM Last edited by whiterider : 12th Oct 2011 at 8:06 PM.
Remember that the DirectX Mesh Tool will delete all your bone assignments, so it's not great for use on body meshes.

They don't have to be exactly the same, no. The lower LODs (higher number = lower LOD, so LOD3 is the lowest level of detail) are used when you zoom out, so that your graphics card isn't having to render a load of beautiful meshes that you can't see properly anyway due to the camera being too far away. The LOD0 and 1 (LOD0 doesn't apply to clothes) should be perfect; the LOD2 should be pretty close but a bit blocky, and the LOD3 just has to look sort of vaguely human. Here are a few EA LOD sets for comparison (and I really hope the autoresizer works on this, 'cause it's a fracking huge image ):

What I lack in decorum, I make up for with an absence of tact.
Test Subject
Original Poster
#37 Old 9th Oct 2011 at 4:55 PM
Oh wow.. it all seems so complicated. Do you think I will ever pick this up? Literally nearly been in tears.. everything I do NEVER goes right ejrgbakbg! I gave up on that dress and thought 'ok, i will try a simple jumper'.. so I just made a little bit longer and I keep on going in game and editing and here are the problems I have been getting. You acnt see the legs with a top in milkshape and I only dragged the bottom down so i dont think i created a new layer??
Seriously never been so stressed out
Screenshots
Née whiterider
retired moderator
#38 Old 9th Oct 2011 at 7:53 PM
Sure you did - a "layer" isn't anything special, it's just having two parts of the clothing over one another. After all, where else is the sim going to put her leg?

To fix something like that, you need to change the bone assignments at the bottom of the top so that that part of the top moves when the sim moves her leg - so if she steps forward, the shirt moves with her leg instead of staying straight, because the shirt is "attached" to her leg bone.
The easiest way to do that is to import a trouser mesh into Milkshape and use it as a guide to give you an idea of which bits should be assigned to which bones. Then you can delete the trousers once you're done.

What I lack in decorum, I make up for with an absence of tact.
Test Subject
Original Poster
#39 Old 9th Oct 2011 at 9:20 PM
oooh, I see! Would you say its pretty easy to do?? I'm so glad you guys are here to help me or I would have NO clue at all! So kind of you helping noobs like me
Née whiterider
retired moderator
#40 Old 9th Oct 2011 at 10:33 PM
First up, go to the Joints tab in Ms and tick Show Skeleton. It's easier to work with bones when you can actually see them .

There are two methods for editing bone assignments. You can use the default Milkshape method; select a vertex (or a group of vertices, but be careful editing the assignments of multiple vertices at once, they usually all need different values), then in the Joints tab you can pick up to four bones using the coloured sliders. The sliders themselves decide how strongly the vertex is attached to each bone.

The second method uses wes h's UniMesh bone thingy plugin, which is found in the Vertex menu (if you don't have the UniMesh plugins yet, get them!). It works basically the same way, except you set the "strength" of the assignment using percentages instead of sliders. The percentages have to add up to 100%, so you can have a vertex assigned 100% to bone 1, or 60% to bone 1 and 40% to bone 3, or 20% to bone 1, 70% to bone 2 and 10% to bone 3, etc.

Which method you use is up to you, pick the one you find easiest to grasp.

What I lack in decorum, I make up for with an absence of tact.
Test Subject
Original Poster
#41 Old 10th Oct 2011 at 7:09 PM
Oohh, I just tried and I just dont have a clue what I am doing Is there a step by step tutorial on bone assigning? If not, can I pay someone to do one?! :P
Ms. Byte (Deceased)
#42 Old 11th Oct 2011 at 12:50 AM
I don't know of a tutorial specifically for clothing bone assignments - maybe someone else does? Hopefully soon I'll have time to get back to my "Meshing for Dummies" tutorial and do a chapter on bones.

There's an excellent comprehensive meshing tutorial here: http://simswiki.info/wiki.php?title...D_Meshing_Index

It's not specifically about Sims clothing meshing, but it gives a good overall picture of what meshing is all about and how bones and animation work. The Milkshape joints panel and the bone tool are covered in the last chapter. Meshing is a big topic and takes a lot of time and work to get good at, so don't get discouraged!
Test Subject
Original Poster
#43 Old 11th Oct 2011 at 6:36 PM
Thankyou Cmar Feel a bit better, today..I went to bed all stressed, haha!! I will keep at it .. I didnt realise meshing was so complex and time consuming. I thought it was literally 'bish bash bosh' done! I will look at that tutorial now, thankyou! And if you could do a tutorial on bone assigning it would be a god send!! Hope you're well!
Ms. Byte (Deceased)
#44 Old 11th Oct 2011 at 7:53 PM
Today I'm ripping my hair out trying to write a scripting mod - got everything done except it refuses to do what it's supposed to do! So I know how you feel. I do have time now so I'll definitely get back to my tutorial series.
Test Subject
Original Poster
#45 Old 12th Oct 2011 at 7:32 PM
Oh god... I would have no hope trying to do that. How do you know how to do all these things?? Self learn?

Just a quick question.. In CAS uni tool, I am trying to make a long top but it only shows a short bit of the torso .. is there anyway to enable a full body view in CASunitool?
Ms. Byte (Deceased)
#46 Old 12th Oct 2011 at 10:06 PM
Yes, self-taught with lots of help, tutorials, and information sharing from the more experienced and brilliant modders here. Also time - I've been working with Sims 3 for over two years and already was familiar with Milkshape from Sims 1.

In CTU you should be able to zoom the view by moving the mouse up and down on the preview window. I don't know any way to move the model up and down.
Sockpuppet
#47 Old 12th Oct 2011 at 10:14 PM
left mouse = rotate

middle mouse= up and down

right mouse = zoom

click and hold
Test Subject
Original Poster
#48 Old 13th Oct 2011 at 6:29 PM
Thankyou guys, but I meant the actually legs are missing.. I will post a photo I was trying to make a long top but I couldnt see the bottom torso so had no clue if it looked ok!
Screenshots
Ms. Byte (Deceased)
#49 Old 14th Oct 2011 at 12:46 AM
I see - CTU will only show you the part you're actually working on. As a workaround you can import a bottom into Milkshape to check for clipping.

Thanks, Bloom. I have my middle mouse button programmed to scroll so I guess I don't get that up and down function.
Test Subject
Original Poster
#50 Old 22nd Oct 2011 at 11:06 PM
Hey guys,
How are you all? Have you all played 'Pets' yet?
I have a question if someone could kindly help me... I want to use a mesh from the Late Night EP, but in CASunitool it only shows the base game meshes. I was just wondering where the package files for outfits are saved ?

Thankyouu
Page 2 of 3
Back to top